Strategies
Strategy 1: Refinement of references using umaps
When to use it
You have selected references, but you are not satisfied with the picking results. The embedding computed from a cluster or reference is not always an ideal representation. Some references just don’t work well, and sometimes umap doesn’t show all the structure that is actually in the umap embedding.
What it does
This strategy takes your references/targets and collects all embeddings that are slightly similar to at least one of your references/targets (similarity > 0.5). These embeddings are then used to estimate a UMAP.
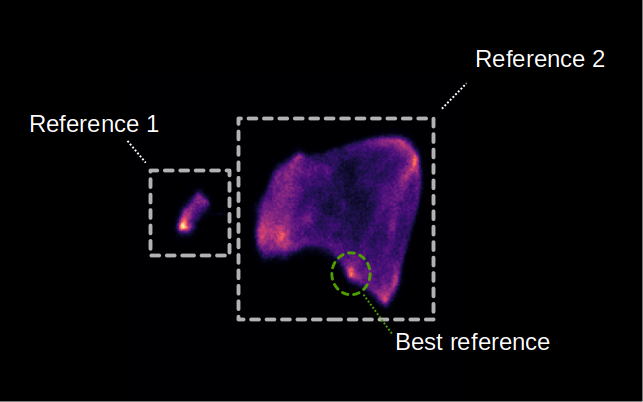
Umap embeddings that have a slight similarity to two manually selected references. Both references either had too many false positives or false negatives. After selecting the cluster highlighted in green, the selection became much more precise.
In some cases, you will see new structures in the umap, where some of these new structures of the umap correspond to irrelevant embeddings (e.g. membranes). By finding the cluster in the umap that actually corresponds to your target protein, you can improve the picking!
How to use it
I assume you ran the reference workflow in this example. But it can easily be used with cluster target embeddings as well.
1. Filter the tomogram embeddings
We first select those embeddings that are reasonably close (-t 0.5) to our reference embeddings.
tomotwin_tools.py filter_embedding -i embed/tomo_embeddings.temb -m map/map.tmap -t 0.5 -o filter/ --lower --concat
2. Estimate umap
tomotwin_tools.py umap -i filter/tomo_embeddings_filtered_allrefs.temb -o umap/
3. Start napari and select regions of interest
To start napari run:
napari tomo/tomo.mrc
After starting napari, load the clustering plugin: Plugins -> napari-tomotwin -> Cluster umap embeddings.
Within the plugin, select the .tumap file in the umap/ folder and press load.
Select your targets in the umap. You can select multiple targets by pressing Shift. Save your targets when you are done. I assume you saved them in cluster_targets/.
4. Map the cluster targets with the tomogram embeddings
tomotwin_map.py distance -r cluster_targets/cluster_targets.temb -v embed/tomo_embeddings.temb -o map_cluster/
5. Locate the particles
tomotwin_locate.py findmax -m map_cluster/map.tmap -o locate_refined/
Check your results with the napari-boxmanager :-)
Strategy 2: Speedup and improvement of embeddings using median filtering
When to use it
You may use this strategy for two reasons:
It makes the embedding step much faster. So you might just want to save time.
It skips a large part of the empty areas of the tomogram, which can improve the umap.
What it does
The command used in the strategy creates a mask. This mask defines a ROI within the tomogram and excludes areas that are most likely not of interest.
It takes advantage of the fact that the average position within a tomogram is unlikely to contain a centered protein. Thus, if a sample of some positions within the tomogram is taken, the median of these embeddings is likely to be a good representation of the background embedding.
The command first calculates the embeddings of a tomogram using a large stride (coarse sampling). It then calculates the median embedding from the coarse tomogram embeddings. Using the median embedding, we can calculate a heatmap of how likely it is that a given position is a background embedding. From this heatmap, a mask is generated using only those positions that are highly dissimilar to the median embedding.

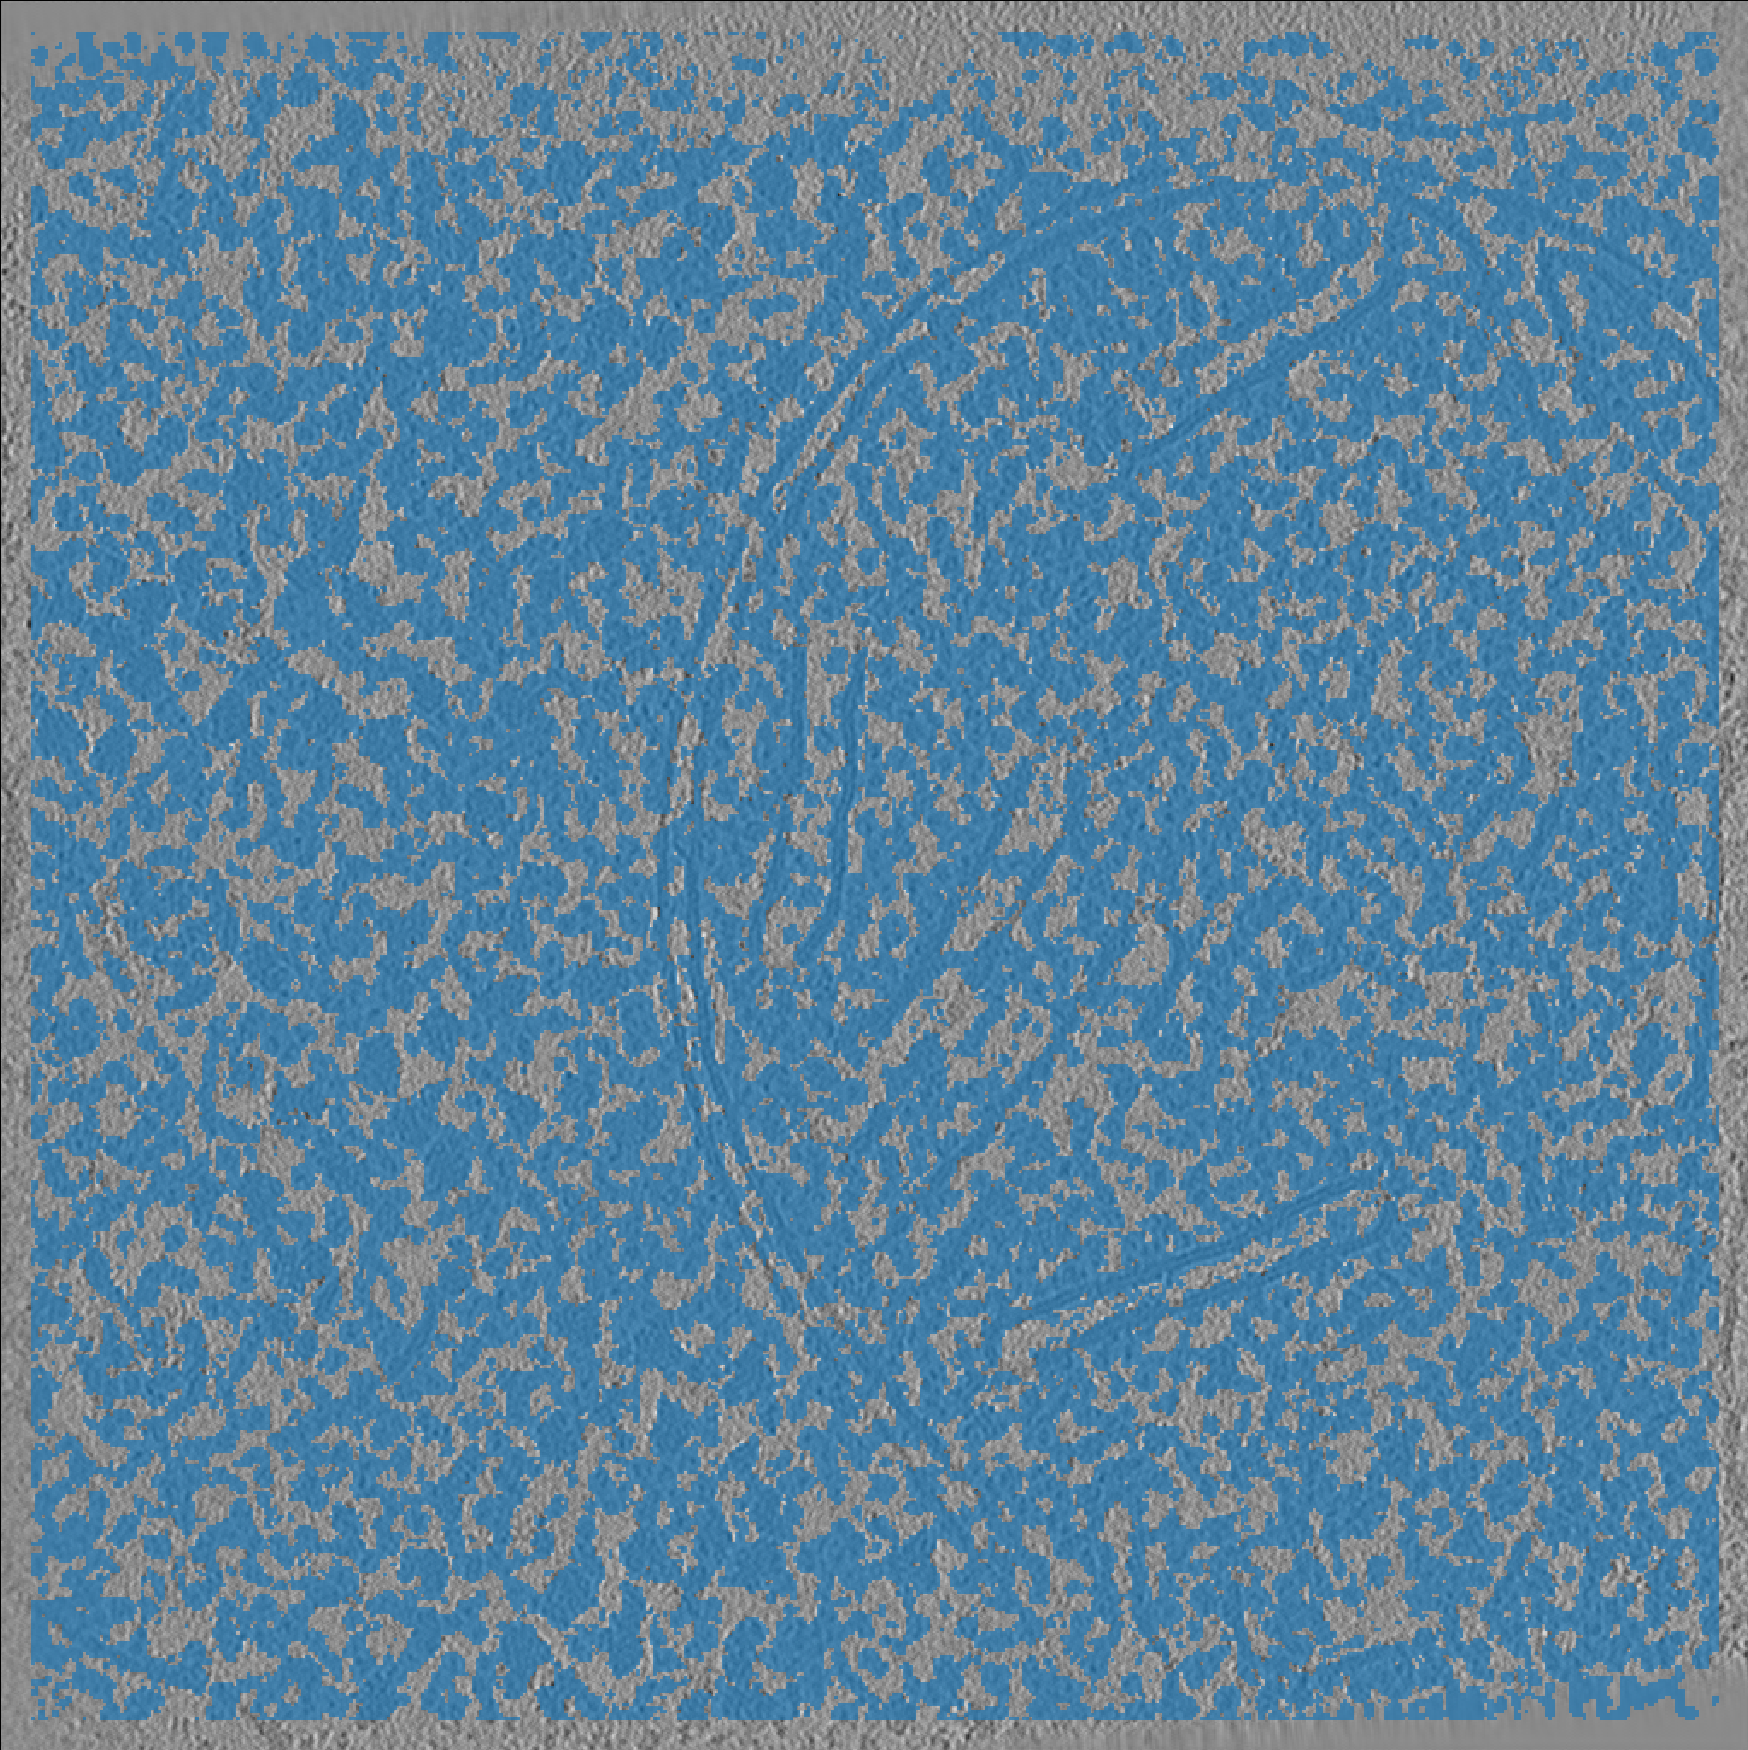
Mask for a Tomogram using the default parameters of the median mask command.
This mask can then be used to compute the embeddings with a smaller stride (fine sampling). But using the mask effectively reduces the total number of embeddings and makes the embedding faster, which is the first advantage of this strategy.

Comparison of processing time using no mask, a mask based on intensity heuristics, and a mask based on the median embedding. All results were calculated using TomoTwin 0.7.
In addition, and this is the second advantage, fewer background embeddings also means that the umap can focus on those embeddings that are actually more important, which may yield more protein clusters.
How to use it
1. Estimate the mask
To calculate the mask, all you need is your tomogram and the latest TomoTwin model:
CUDA_VISIBLE_DEVICES=0,1 tomotwin_tools.py embedding_mask median -i tomo/tomo.mrc -m tomotwin_latest.pth -o mask
2. Calculate the (filtered) embeddings
CUDA_VISIBLE_DEVICES=0,1 tomotwin_embed.py tomogram -v tomo/tomo.mrc -m tomotwin_latest.pth --mask mask/tomo_mask.mrc -o out/embed/tomo/ -s 2
Once the embeddings are computed, you can simply continue with either the reference or clustering workflow.
Strategy 3: Filtering tomogram embeddings based on the median embedding
When to use it
You didn’t use masking for your tomogram embedding and are having a hard time finding your proteins in the UMAP. Or you just want to speed things up.
What it does
This strategy takes the embeddings from a whole tomogram, calculates the median embedding, and removes any embeddings with a high similarity to the median.
Filtered embeddings created using the default application of this strategy. Total embedding size reduced by 58%.
Note that this strategy is redundant with strategy #1. If you already performed masking during your embeddings do not use this strategy.
If instead you embedded the entire tomogram, this strategy will typically removes background embeddings which speeds up later steps and improves the UMAP interpretability.
How to use it
1. Calculate the median embedding
We first calculate the median of the tomogram embeddings.
tomotwin_tools.py median_embedding -i embed/tomo_embeddings.temb -o median_embedding/
2. Calculate the distance map from the median
Next we map the distance between the median embedding and the rest of the tomogram embeddings.
tomotwin_map.py distance -r median_embedding/embed_med.temb -v embed/tomo_embeddings.temb -o map_median/
3. Filter the tomogram embeddings
Next we filter the tomogram embeddings to remove any embeddings reasonably close to the median (t > 0.5).
tomotwin_tools.py filter_embedding -i embed/tomo_embeddings.temb -m map_median/map.tmap -t 0.5 -o median_filtered/
4. Estimate umap
tomotwin_tools.py umap -i median_filtered/tomo_embeddings_filtered_.temb -o umap/
5. Start napari and select regions of interest
To start napari run:
napari tomo/tomo.mrc
After starting napari, load the clustering plugin: Plugins -> napari-tomotwin -> Cluster umap embeddings.
Within the plugin, select the .tumap file in the umap/ folder and press load.
Select your targets in the umap. You can select multiple targets by pressing Shift. Save your targets when you are done. I assume you saved them in cluster_targets/.
6. Map the cluster targets with the tomogram embeddings
tomotwin_map.py distance -r cluster_targets/cluster_targets.temb -v embed/tomo_embeddings.temb -o map_cluster/
7. Locate the particles
tomotwin_locate.py findmax -m map_cluster/map.tmap -o locate_refined/
Check your results with the napari-boxmanager :-)
Strategy 4: Manually refining UMAPs from selected embeddings (Napari GPU workaround)
When to use it
Use this strategy as a workaround to refine UMAP embeddings if you don’t use Napari on a machine with GPUs.
What it does
This strategy allows you to manually recalculate UMAP embeddings that you can then reload in the Napari GUI.
How to use it
1. Run the clustering workflow
This strategy works with the clustering workflow. Therefore run the clustering workflow including cluster selection in Napari, save the clusters that you would like to recalculate.
2. Recalculate the UMAP from the embeddings from each cluster of interest.
Now we manually recalculate the UMAP for each cluster we would like to refine. For example if you labeled your cluster cool_protein:
tomotwin_tools.py umap -i out/clustering/embeddings_cool_protein.temb -o out/clustering/refined/
3. Visualize the refined UMAP in Napari
Now you can load the refined UMAP in napari-boxmanager and look for subclusters that pick your protein of interest better